I'm Back........
Well, every vacation has to come to an end...now it is back to our daily routine. I don't know about you but I am very comforted by routine.
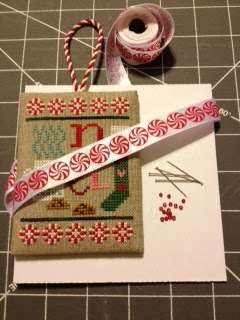
Ornament #3....Ruched Ribbon
You will need:
Chipboard
Low Loft Quilt Batting
Backing Fabric
Twisted Cord
Pins
Beads--I used 10/0 red beads
Peppermint Ribbon--from the scrapbook area at Hobby Lobby
By now you know the routine--measure and add 3/8 inch to width and height. Pad one side of the front and back with the batting.

Cover the back with backing fabric and center the stitching on the front. Tape/glue twisted cord hanger to the back. Then sew front and back together.
.JPG)
Now the fun part--start by getting your supplies together--ribbon, pins and beads.
Pick up a bead on the pin and then "sew" the pin thru every other peppermint. Be sure to catch the top and bottom edge of the ribbon. Start the sewing about 8 peppermints from the end of the ribbon.

Start at the bottom of the ornament. The first pin will be place in the middle of the 4th stitched peppermint from the right along the bottom--second middle of the 5th. Third pin will be place at the bottom right corner. The goal is for the pin to be placed between the two layers of chipboard---be careful!!! Pins are sharp and can poke out on the front or back of the cardboard.
.JPG)
The long sides can be marked for pin placement--about every 1/2 to 3/4 inch. Sometimes you have to coax the ribbon to show the peppermint...I used a chop stick to urge it into place.

Once you get the hang of it just continue around the ornament...ir really helps to have the bead/pins already sewn to the ribbon.
.JPG)
Around to the second loop on the left bottom---now bring the two ends together and tie a square knot...I managed to have a peppermint in the middle....you can too.
Thursday I am going to publish a camp project...It uses a Whitman 100th Anniversary Tin. I know most of you were not there but you can enjoy the pictures...enjoy!!


Hi Mona,
ReplyDeleteThanks so much for this tutorial. I love finishing and I am so glad you are showing me some of your tricks to finish. I was wondering if you use acid free chipboard. Please let me know. Thanks !!
It doesn't say.....hummm? Good question. Will see if Hobby Lobby knows.
ReplyDeleteNatalia,
ReplyDeleteHL..."thinks" it is acid free....ha!!!!
Wouldn't the pins work their way out at some point? I love this finish, just not sure I understand it.
ReplyDeleteWon't the pins work themselves out? I love this look but worried about it coming apart!
ReplyDeleteI like to do my finishing. Your ideas are the greatest!!!
ReplyDeletegclub
gclub casino online
จีคลับ
I just found this site!! Oh my, how do I find the cutest projects ever! I need to start crossstitching again. I love snowmen and Christmas!
ReplyDeleteHelp guide me. Thank you and finishings are awesome ideas. I had no clue about this !!! Now that the "cooking" scenario is over, I can relax and crossstitch! Wow!