Saturday, December 21, 2013

Let it Snow....

Number eleven and counting!  This is very similar to Noel with the cute peppermint ribbon.  By the way I have several rolls of that ribbon if you need some let me know.

Refresh your memory by reading the April 16th post.  This will differ as there are no motifs on the ribbon. Measure and cut your chipboard forms. Fluff one side of each with quilt batting


Backing fabric will go on one form and stitching on the other.  Attach hanger from twisted cord or narrow ribbon.

Sew front to back.  Remember to catch only the fabrics--no chipboard!

Assemble supplies--ribbon, straight pins and beads.


Leave about ten inches of ribbon and pick up a bead on a pin.  Sew pin through the ribbon.


Continue to sew beaded pins through ribbon with about 1/2 inch between the pins. I cheat and use my thumb nail as a guide for placement.
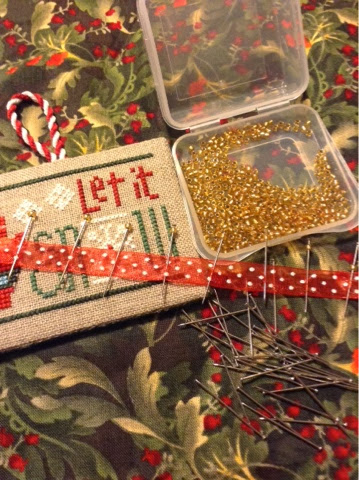

Do about 15 pins and then start placing them in the ornament.  Slip pins between the two layers of chip. Try and catch a little of the chip to secure them.  Be careful as if you pierce the board you can catch a finger and bleed on the ornament...voice of experience!!!  Start at the top middle.  


Repeat process until you return to top middle.  I use the end of a marker to push in the pins. It really saves the finger tips.


Tie ends into a bow and anchor now with a pin with two beads threaded onto it!  Number 11 is finished. Tomorrow brings number twelve and the end of this series!!


Monday, December 9, 2013

Put a Little Love In Your Life...

Another quick technique....any flat trim will work. I used gimp but rick rack or lace would work also.

Measure 1/4  inch out from the right side of the stitched design and glue or slip stitch trim in place.  Make sure to add about an extra inch of trim to the top and bottom for finishing


Measure stitched design and add 1/4 inch to all sides. My ornament measured 3.5 by 3. Cut two pieces from chipboard and cover one side of each with batting. 


Stitching will be centered on one piece and backing fabric on the other.


Use cord or ribbon for hanger and secure it to top center.  Slip stitch front to back leaving about half an inch open at center top.  Use skewer to poke cording into opening you left at top of ornament.


Glue or slip stitch trim around edge of ornament.  Let dry before tucking in end of trim...remember to tape before cutting end of trim.


It is dry, tucked and looking great.  


Meet me here on Thursday for out next  ornament...Let it Snow...yes, I am aware I skipped Silent Night...I am waiting on green buttons...

Sunday, December 8, 2013

I've Got the Joy

Joy down in my heart..

Given up on me?  I hope not. This has to be the busiest year of my life. Sorry to have taken so long but we will finish by next Sunday.

Joy is a combination of the copier technique used in "Cheers" and the corded simple ornament used in "Merry". Refresh your memory by reading those post.

After you have made a copy of your stitched "Joy" make a paper template leaving about 3/8 of an inch all around

Cut two pieces from chipboard. Pad one side of each with low loft batting. Cover one with backing fabric and the other with the stitching.


Place wrong sides together and stitch together. Leave opening at top for cord ends.

Cord using the same directions given in the July 2 posting.....

See you tomorrow for "LOVE"!!

Tuesday, October 1, 2013

Simple Hanging Pillow

1.  Interface the back of the stitched piece and backing fabric.


2.  Placing right sides together sew around the pillow leaving a two inch opening.  Clip corners


3.  Turn right side out and stuff.


4.  Glue or sew cording in place.


5.  Bring cord around to create a hanger.


Another finish....we can do it!!!

Sunday, September 8, 2013

Wool Backed Ornament

This is another no sew finish for ornament finishing....very similar to the banner finish way back in February.

1.  Measure, add 1/8 inch, cut the chipboard and fluff the board....seems to be our usual start!


2.  Mount the stitched ornament on the padded chipboard form.


3.  Center twisted cord hanger to the center top of the ornament. Secure with glue and tape to the back side.


4.  Glue or slip stitch felted wool or felt to the back of the ornament. Use pinking shears or pinking rotary cutter to trim felt 1/8 inch from sides of the ornament.  Don't you just love the pop of the non-traditional color!


5.  Repeat with second layer of woo/felt.


Another one finished.  How did it get to be September so quickly?  Will have to kick it into high gear to finish this project by November 15....that is my drop-dead deadline...ha!

Sunday, July 28, 2013

Are we back in kindergarten?????

This is a super easy way to create a festive Christmas cracker....

1.  Take an empty toilet paper tube or a length of PVC pipe cut to length.


2.  Cover the tube with low-loft quilt batting--do not globby glue as the glue will seep thru the batting.


3.  Wrap the stitching around the padded tube and stitch or glue in place.  I slipped stitched mine together as it allowed once last chance to center my stitching lengthwise.  Cover seam with rick rack.


4.  Trim ends of linen leaving about 1 inch to fold down....it tends to want to wrinkle so take your time and smooth things out.  You can tape ends down or glue them in place.


5.  Cut 1 foot lengths of tulle....play with them to see how full you want the ends. 


6.  I stuffed the inside of the tube with tulle to keep the ends from pulling away from the outside ends....if not you will get "skinny ends"....ha!!!


7.  Loosely tie with ribbons. 


Enjoy your latest creation.

Tuesday, July 2, 2013

You call this FAST TRACK......

If anyone can find the last month please let me know.  I really don't know where time goes but I hope it is having a really good experience!!!

On to our next ornament.  This one is Merry.  I love the little lacy edge along the bottom.  If you have decided to do your ornaments in more traditional colors you might want to edge this one in lace.

Finishing Directions:

First measure, add 1/8 inch on all sides, cut forms from the chipboard and attach quilt batting to one side of each board.


Center stitching on one board and backing fabric to the other.  When gluing try and keep the glue about 1/4 inch from the edge as it is no fun dragging your needle thru dried glue when you sew the two sides together.


Place front to back and slip stitch around the edges.  Leave 3/4 inch open at the center top.


Knot your cording to form hanging loop.  Begin by placing the cord end (the one closest to the knot) into the opening.  Glue or stitch cording around the ornament returning to the opening.  Let glue dry, TAPE cording, and then slip cord end into the opening.


Another ornament finished and ready to hang.  


Next ornament will be Wait til Dec. 25!   You will need a toilet paper roll... Just like kindergarten and I promise we will have fun!

We need to get these finished up so we all can begin stitching Lizzie*Kate's new Mystery Christmas Sampler....it is going to be wonderful.

The Pocket

Next comes the pocket....remember  your pocket can be any shape you want.  What we did is just a suggestion. Look at the template and you ...