Thursday, April 25, 2013

Summer Finishing Frenzy....

Here is the picture of the "simplified" Uncle Sam project....as you can see I really did my best to make him quick and easy to stitch.


We are going to have so much fun this summer....don't stress the stitching as the main focus will be on the finishing techniques.  Contact me if you have any questions.

Happy Finishing,
Mona

Thursday, April 18, 2013

Sewing Box.....Camp Wannasew Project

This is a project that we recently did at the Spring Camp Wannasew.  Several campers did not get finished so I said I would post the directions on my blog.  This technique can be used for any size box....here goes.

This is the box we used....


Cut a piece of chipboard the same size as the bottom of the box.  You might have to trim until you get a good fit....round of the corners slightly for the candy box.  Cover the chipboard with a layer of low loft quilt batting and trim to fit.  Then cover with matching fabric.


We selected several motifs that came in the tin...in addition to the yummy candy.  Angie chose to do a long thin motif for the scissor keep.  Decide how much linen you want to show on the front and fold into a long tube.  I slip stitched the top and bottom together for form a flat tube...added two buttons and fringed the ends.  This is the back.

Now a picture of the front.

The second motif is going to be attached to felted wool.  Decide how much linen you want to show on the front and mark the measurement on all four sides.

Fold back the edges, trim leaving about 1/2 inch all around and attach to the wool with matching thread.

Trim the wool using pinking shears or a rotary cutter with pinking blade---they are wonderful and well worth the price.

The next piece was trimmed, fringed and attached to the wool with beads, or buttons.

Now you have three pieces...you can play around with them until you get a pleasing arrangement.
 
Slip your scissors into the scissor loop and you have a great sewing box.  Enjoy!

Tuesday, April 16, 2013

I'm Back........


Well, every vacation has to come to an end...now it is back to our daily routine.  I don't know about you but I am very comforted by routine. 

Ornament #3....Ruched Ribbon

You will need:
Chipboard
Low Loft Quilt Batting
Backing Fabric
Twisted Cord
Pins
Beads--I used 10/0 red beads
Peppermint Ribbon--from the scrapbook area at Hobby Lobby

By now you know the routine--measure and add 3/8 inch to width and height.  Pad one side of the front and back with the batting. 


Cover the back with backing fabric and center the stitching on the front.  Tape/glue twisted cord hanger to the back.  Then sew front and back together.


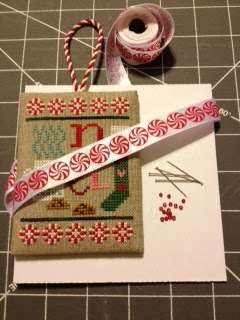
Now the fun part--start by getting your supplies together--ribbon, pins and beads.


Pick up a bead on the pin and then "sew" the pin thru every other peppermint.  Be sure to catch the top and bottom edge of the ribbon.  Start the sewing about 8 peppermints from the end of the ribbon.


Start at the bottom of the ornament.  The first pin will be place in the middle of the 4th stitched peppermint from the right along the bottom--second middle of the 5th.  Third pin will be place at the bottom right corner.  The goal is for the pin to be placed between the two layers of chipboard---be careful!!!  Pins are sharp and can poke out on the front or back of the cardboard.

The long sides can be marked for pin placement--about every 1/2 to 3/4 inch.  Sometimes you have to coax the ribbon to show the peppermint...I used a chop stick to urge it into place. 


Once you get the hang of it just continue around the ornament...ir really helps to have the bead/pins already sewn to the ribbon.


Around to the second loop on the left bottom---now bring the two ends together and tie a square knot...I managed to have a peppermint in the middle....you can too.


Thursday I am going to publish a camp project...It uses a Whitman 100th Anniversary Tin.  I know most of you were not there but you can enjoy the pictures...enjoy!!


Monday, April 8, 2013

Where's Mona???

Hi...thought I would let you know the next ornament will be posted on or after Tax Day

Right now I am very busy being very lazy. We are on a Hawaiian Cruise with 30+ happy stitchers. This is truly a beautiful time in paradise

Expect to hear from me next week
Aloha


Monday, March 11, 2013

Box Ornament--Ho Ho Ho

1.  Measure length and width of completed stitching--add 3/8 inch to each measurement.

2.  Cut two pieces of chip board using these measurements--one will used for the stitching and one for the back of the box.  Cover one side of each with low loft quilt batting.  Center stitching on the front and cover the back with coordinating cotton fabric.

3.  Cut side pieces same length as the front and 1.25 inches wide--cut two.  Cut top and bottom pieces same width as the front and 1.25 inches wide--cut two.  You should have two sides, one top and one bottom.  Tape outside pieces together in this order side-top-side-bottom. 

4.  Cut fabric 1 inch wider and longer than the taped together outside pieces.  Glue fabric edges to the back of the unit.  Miter corners to keep the bulk away from the edges.

5.  Glue rick rack on top of fabric. 

6.  Bring ends of the outside unit together and slip stitch the fabric ends together--catch just the fabric not the chip board.

7.  Use a couple of pins to position the back on top of the outside unit...slip stitch back to the edge of the unit...again just catching the fabric not the chip board.

8.  Repeat process with the front--leave 3/4 inch un-stitched in the lower left edge.  You will use the opening to insert the twisted cord ends.

9.  Use fabric glue to attach twisted cord around the front of the box.  Use a skewer to help open up the hole and poke the cord end into the opening.  Glue in a clockwise direction returning to the opening.  Let glue dry completely before  slipping in the cord end.

10.  Attach bow to top of the ornament with hot glue....yeah two done and only 10 more to go!!!

Thursday, February 14, 2013

Deck The Halls--Mini Banner

Supplies needed:
Chipboard
Ruler
Straight Pins
Felt
Twisted Cord
Pinking Shears/Rotary Cutter
Fabric Glue

1.  Measure finished stitching...add 3/8 inch to width and length.  Use these measurements to cut a piece of chipboard.   


2. Center Stitching over the chipboard...you can use some straight pins to keep in centered.


3.  Wrap the extra side fabric to the center back of the chipboard.  You want it to match up in the center of the back.  Trim excess fabric.  The ends can be join with needle and thread using a whip stitch or glue. 


4.  Top will be folded to the back.  I like to cut some of the fullness out of the back fabric so it will lay flatter.  Again whip stitch or glue to back.


5.  Decide how long you want your fringe to be...mine was 1/2 inch.  Use the bottom edge of the chipboard to be your signal as to where to stop fringing....you want the same about of fabric at the top and bottom of the piece. 


6.  Place your fringed ornament on top of the felt.  Decide how much felt you want to show and trim the edges.  You can glue the stitching to the felt or ship stitch it with matching thread. 


7.  Hanger is made with two color twisted cord.  Knot and fringe cut ends...again glue or stitch in place.


WOW...you did it....only eleven more to go. 

The plan is to blog a set of finishing directions every couple of weeks.

Happy Finishing,
Mona

Tuesday, February 12, 2013

Are You Ready???

I'm ready...how about you?  It is time to get your supplies gathered together and meet me here on Thursday. Our finishing adventure will begin.

See you then.
Mona

The Pocket

Next comes the pocket....remember  your pocket can be any shape you want.  What we did is just a suggestion. Look at the template and you ...