I appreciate your encouragement during the finishing of the Jingle ornaments. If you have any finishing questions or techniques you would like explained just post your comment and I will try and give you some help.
Now the gift part....I would like to offer my finishing services to one lucky reader. Just post your name and which technique was your favorite. We will pull a name "out of the hat" and he or she will have an ornament of their choice finished for FREE...yeah!!!
Just a little gift from me to you.....
Winner will be selected on January 7th, 2014. Good Luck
Monday, December 30, 2013
Thursday, December 26, 2013
Hurry, only 364 days until Christmas!!!
The last ornament....


Stuff and add the buttons.


This technique can be used for ornaments and pillows.
Interface the back of the stitching. I like the pre packaged interfacing at Hancock's Fabrics. It is good for stitching projects.
Trim stitching leaving 1/2 inch on all four sides. Cut 2 inch strip of check fabric for bottom and piece for backing--interface all.
Sew two inch strip to bottom of stitching. Use 1/4 inch seam allowance. Sew on rick rack trim. HINT...glue trim in place before sewing!
Sew front to backing Leave opening for turning right side out...clip corners then turn.
Stuff and add the buttons.
Add bow on top and we have officially finished twelve cute ornaments!
I have so enjoyed working through these ornaments with you. Stay tuned more finishing tutorials.
Saturday, December 21, 2013
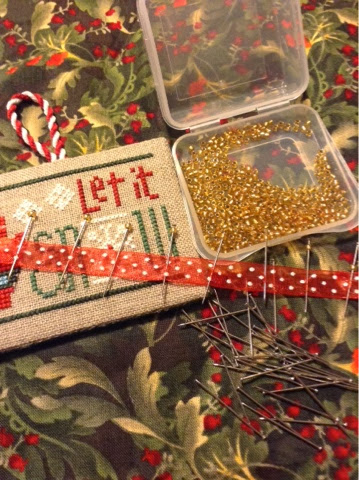
Let it Snow....
Number eleven and counting! This is very similar to Noel with the cute peppermint ribbon. By the way I have several rolls of that ribbon if you need some let me know.


Refresh your memory by reading the April 16th post. This will differ as there are no motifs on the ribbon. Measure and cut your chipboard forms. Fluff one side of each with quilt batting
Backing fabric will go on one form and stitching on the other. Attach hanger from twisted cord or narrow ribbon.
Sew front to back. Remember to catch only the fabrics--no chipboard!
Assemble supplies--ribbon, straight pins and beads.
Leave about ten inches of ribbon and pick up a bead on a pin. Sew pin through the ribbon.
Continue to sew beaded pins through ribbon with about 1/2 inch between the pins. I cheat and use my thumb nail as a guide for placement.
Do about 15 pins and then start placing them in the ornament. Slip pins between the two layers of chip. Try and catch a little of the chip to secure them. Be careful as if you pierce the board you can catch a finger and bleed on the ornament...voice of experience!!! Start at the top middle.
Repeat process until you return to top middle. I use the end of a marker to push in the pins. It really saves the finger tips.
Tie ends into a bow and anchor now with a pin with two beads threaded onto it! Number 11 is finished. Tomorrow brings number twelve and the end of this series!!
Monday, December 9, 2013
Put a Little Love In Your Life...
Another quick technique....any flat trim will work. I used gimp but rick rack or lace would work also.
Measure 1/4 inch out from the right side of the stitched design and glue or slip stitch trim in place. Make sure to add about an extra inch of trim to the top and bottom for finishing

Measure stitched design and add 1/4 inch to all sides. My ornament measured 3.5 by 3. Cut two pieces from chipboard and cover one side of each with batting.

Stitching will be centered on one piece and backing fabric on the other.

Use cord or ribbon for hanger and secure it to top center. Slip stitch front to back leaving about half an inch open at center top. Use skewer to poke cording into opening you left at top of ornament.

Glue or slip stitch trim around edge of ornament. Let dry before tucking in end of trim...remember to tape before cutting end of trim.

It is dry, tucked and looking great.

Meet me here on Thursday for out next ornament...Let it Snow...yes, I am aware I skipped Silent Night...I am waiting on green buttons...
Sunday, December 8, 2013
I've Got the Joy
Joy down in my heart..


Given up on me? I hope not. This has to be the busiest year of my life. Sorry to have taken so long but we will finish by next Sunday.
Joy is a combination of the copier technique used in "Cheers" and the corded simple ornament used in "Merry". Refresh your memory by reading those post.
After you have made a copy of your stitched "Joy" make a paper template leaving about 3/8 of an inch all around

Cut two pieces from chipboard. Pad one side of each with low loft batting. Cover one with backing fabric and the other with the stitching.
Place wrong sides together and stitch together. Leave opening at top for cord ends.
Cord using the same directions given in the July 2 posting.....
See you tomorrow for "LOVE"!!
Subscribe to:
Posts (Atom)
The Pocket
Next comes the pocket....remember your pocket can be any shape you want. What we did is just a suggestion. Look at the template and you ...

-
 I had the honor to finish the Heart In Hand Square Dance series. We chose the Quick and Easy Easel technique which is excellent for holiday ...
 -
 How cute is the new Lizzie Kate Snow Story. Here are a few quick tips to help make yours look just like our model. First pick up a pack...
 -
 I'm Back........ Well, every vacation has to come to an end...now it is back to our daily routine. I don't know about you but I ...